

Nothing sours a perfect day out on two wheels faster than a flat tyre.
One moment you’re cruising with the wind in your face; the next, the rubber beneath you starts to sag.
But don’t panic – it’s not the end of the ride.
With a bit of know-how and the right tools, you can be back on the road in no time.
First things first: find a safe spot by the roadside to work. Avoid blind corners or narrow shoulders – safety comes before speed.
Once you’re settled, flip the bike over or prop it securely to inspect the problem.
A quick visual check usually tells you where the air’s escaping.
Sometimes it’s a nail, a shard of glass or even a thorn still embedded in the tyre. Other times, it’s just a slow leak from a tiny puncture you can barely see.
Next, remove the wheel.
It’s a straightforward process on most modern bikes.
Mid-range and high-end models typically have a quick-release skewer – a small lever at the axle that, when flipped and twisted, frees the wheel.
If your bike has rim brakes, you’ll need to release the cable that holds the brake arms before the wheel comes off.
For disc brakes, the wheel slides right out once the skewer’s undone.
Older bikes are a bit more hands-on. They use nuts and bolts, so you’ll need a spanner or wrench to loosen them.
Once the wheel’s off the fork – and the chain freed, in the case of the rear wheel – it’s time to deal with the tyre itself.
This is where tyre levers come in handy. Use them to gently pry one side of the tyre off the rim, creating enough space to reach the inner tube.
Carefully pull the tube out, keeping track of how it was seated.
Now comes the detective work: find the leak.
Pump a bit of air into the tube and listen for the hiss. You can also dunk it in water if you’re near a tap or bottle – bubbles will reveal the puncture.
If there’s still something sharp stuck in the tyre or tube, remove it.
Then assess the damage. A small hole can be patched easily with a self-adhesive patch – no glue needed.
But if the tube is badly torn or shredded, don’t waste time trying to save it. Replace it with a new one.
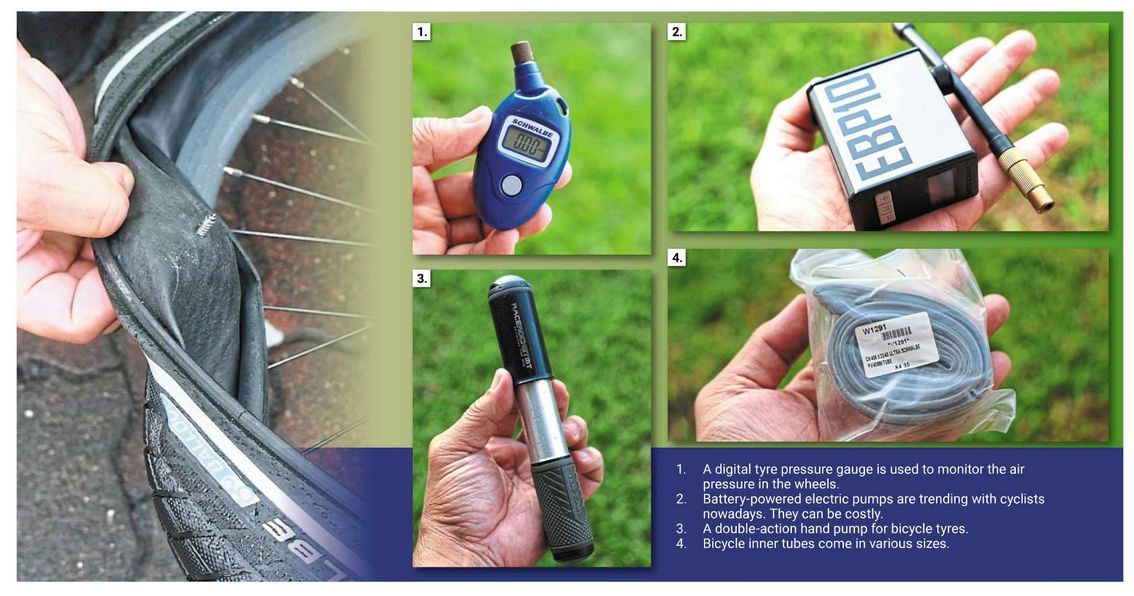
Remember, tubes come in different sizes. There’s no such thing as a one-size-fits-all version.
Check your tyre’s sidewall for numbers that indicate its size – your new tube must match these.
Once patched or replaced, tuck the tube back into the tyre neatly.
Make sure the valve is straight and the tyre’s tread pattern faces the correct direction – most tyres have a small arrow printed on the sidewall to guide you.
Now it’s time to bring the wheel back to life.
Inflation can be done the traditional way with a hand pump or using a CO2 inflator, which is much faster.
To use the latter, twist the threaded cartridge into the inflator head – the sudden burst of gas will pop the tyre back to pressure almost instantly.
Just remember, CO2 cartridges aren’t cheap and can only be used once.
A compact electric pump is another convenient option, though it adds extra weight to your gear.
Whatever method you prefer, the key takeaway is simple: be prepared. Carrying a spare tube, a patch kit and a pump should be as natural as wearing a helmet.
Every cyclist, whether casual or seasoned, should know how to handle a puncture.
Otherwise, that leisurely weekend ride could turn into a long, sweaty walk pushing your bike instead of riding it.