
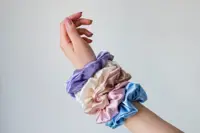
Make your own bunny-themed scrunchie from scratch.
Of all the sewing machine projects, making a scrunchie tops the list for being the easiest make ever. But to mark today’s Easter celebrations, we’ll be upping the ante a little by adding a pair of “bunny ears” to the project.
The bunny ears scrunchie has been all the rage in South Korea. The trend has definitely reached our shores too, because who can resist? They’re cute and quirky and perfect for jazzing up any top knot bun.
Happy Easter!
â–
Lee Mei Li is the author of Hello Kitty Crochet. She crafts and blogs at amiguruMEI.com. E-mail her at star2@thestar.com.my.

DIY bunny ears scrunchie
Skill level: Intermediate
Time required: 30 minutes

1. Cut out a 45 x 7cm fabric rectangle. With the wrong side facing down, fold the piece lengthwise and pin in place.

2. Cut out another fabric rectangle that’s 30 x 12cm. Again with the wrong side facing down, fold the piece in half.

3. Fold the piece again and hold in place. Now we’ll be drawing the bunny ears. The shape will look like half of a leaf complete with a stem. Start drawing from where the fabric edges line up — make it pointy, then curved and wide in the centre before ending with a straightened “stem” when you come to the folded centre.

4. Cut following the lines. When you open it up, it should look like this.

5. With the wrong side facing down, fold the piece in half lengthwise and pin in place.

6. With a 5mm seam allowance, start sewing the tube-shaped scrunchie piece from earlier from one end to the other. Next, sew the ears, but leave a 2.5cm opening in the centre so you can turn the piece inside out. Once you’re done sewing, turn both pieces inside out — this may take a little patience. You can use the blunt end of your marker to help speed things along. Press the pieces flat with a hot iron.

7. Cut a 22cm piece of elastic. Attach a safety pin onto one end. Using the safety pin as an anchor, insert the elastic through the scrunchie tube. Guide it all the way through to the other side, bunching up the fabric as you go along.

8. Once the elastic comes through the other side, knot the ends together tightly. Sew the opening of the scrunchie close. Do the same for the bunny ears. Tie your bunny ear piece over the stitched part of the scrunchie.Â
Already a subscriber? Log in
Get 20% OFF The Star Digital Access
Cancel anytime. Ad-free. Unlimited access with perks.